Showing posts with label Birthday. Show all posts

Wednesday, April 9, 2025

Crafty Gals Corner- Challenge # 266- Fill in the Blank: Adorable__________


Hello Crafty Friends,

I am sure you have noticed that we have a new look with new graphics at Crafty Gals Corner.  I love the cherry blossoms and the fresh new look.  We still are the same group of designers and crafty gals, just with a new fresh look. 

Our challenge this month is Fill in the blank: Adorable _________.

The stamp I received to color up this month is from Poladoodle entitled "Party Balloon Bunny".  I think she is adorable and why I chose her for our challenge this month.


Here is the card I created. 


My color inspiration came from the Echo Park paper pack "Happy Birthday". Once I had picked the paper, I matched the solid papers and began coloring using my Copic Markers.
 
Fur: E57, E23, E34
Ears: E23, E34, RV34, RV10
Tutu and Balloon: BV17, BV13, BV02
Flowers: R89, R85, R83
Leaves: G99, G94, YG03, G28, G24
 
I used a label die from Stampin Up to cut out the bunny for my focal point.  I added some lace from my stash also.  To finish the card, I added the sentiment sticker from the paper pack and some peals from Pink and Main,  
She is ready for her next party and she is adorable.
 
Now it is your turn. Leave me a comment and then go and share an "adorable" project with us over at Crafty Gals Corner. 


Friday, November 1, 2024

Mix It Up Challenge Blog- Challenge- Paper Piecing


Hello Crafty Friends,

Have you ever paper pieced an image before?  I loved creating those paper dolls from the Cricut cartrudge many years back, which I still have, to create cute little people.  Not quite the same thing, but so much fun. If you do, that is the challenge at Mix It Up Challenge Blog this month; Paper Piecing,

 I used the birthday stamp from Simon Says stamps to paper piece the balloons for a cute birthday card.

Here is the card I created:


I stamped the image 3 times, 2 times on the card front and one time on a scrap piece of the same blue cardstock.  I then stamped the image several times on different colors of cardstock.  I then cut out each balloon and party popper with the color I wanted.  I glued all the pieces to the individual stamped image.  I then popped this image up on the card front.

To finish the card, I layered the card front on another piece of blue cardstock.  I also stamped the sentiment from Taylored Expressions in black ink at the top. 

I hope you try paper piecing if you have never tried it.  Please leave me a comment and then join the challenge at Mix It Up Challenge Blog.

Wednesday, September 11, 2024

Crafty Gals Corner Challenge #259- Anything Goes with a Twist- Add ribbon


 Hello Crafty Friends,

What a whirlwind start to September here in Southern California.  We are having a heat wave, there are fires all over the area and school is in full swing.  The season seems to be starting out on a quick pace, but I hope it slows down because this season is my favorite.

Time is going by so fast that my friends and I have not celebrated our August friends birthdays yet and it is already the middle of September.  

The card I created for this new challenge at Crafty Gals Corner, will be used as a birthday card for one of my friends.


A note from Rachelle Anne Miller:
I am an artist & designer living in the beautiful Adelaide Hills in South Australia with my husband and three amazing children! I love to create and am especially drawn to all things cute. I've worked on children's books, greeting cards, craft supplies, children's room décor, tech accessories, and more. I love to bring out joy and imagination in my art and create something a little different to inspire and make you smile.

I used this adorable "Happy Birthday Character Creator Set" from RAM stamps.


I first colored the images with my Copics. (First set of numbers is for the girl in pink and the second set of numbers are for the girl in yellow)

Hair: E29, E08, E13 and E29, E25, E35

Skin: E43, E53, E50 and E13, E11, E21 

Dress: R85, R83, RV11, RV10 and Y38, Y19, Y15, BG34, BG11

Hats: R27, R35

The card base is created using the Paper pack from Echo Park called It's Your Birthday.  The sentiment is foiled and is from Taylored Expressions.

Thank you for stopping by.  Please leave me a comment and then join the challenge over at Crafty Gals Corner.

Sunday, September 1, 2024

Love to Craft Challenge Blog- Anything Goes


Hello Crafty Friends,

New month and new challenge at Love to Craft Challenge This month I was lucky enough to get to play with this adorable digi from All Dressed Up entitled "Birthday Girl".

I used the paper pack from Echo park "Happy Birthday" for the card front.

I then colored the image with my Copics:

Hair: E49, E44, E43

Skin: E13, E11, E21

Unicorn: C3, C1, C0

Dress, Shoes and bows: V25, V22, V20

Table and Unicorn: R85, R83

I love how the card came out and can't wait to give it to the recipient.

Now it is your turn.  Leave me a comment and then create your own creation and share it with us at Love to Craft Challenge Blog.

Wednesday, June 12, 2024

Crafty Gals Corner- Challenge # 256- Anything goes with a Fancy Fold Twist


Hello Crafty Friends,

Can you believe it is June already?  Today is my last day of work for the summer and I am so excited.  Only a few more hours and then it is all about crafting and relaxing this summer.  

This month's challenge at Crafty Gals Corner is Anything Goes with a Fancy Fold twist.  Since I plan to use this card as a birthday card for my brother, I did not do the fancy fold technique.

I chose this awesome Beryl the Biker from Dr. Digi's House of Stamps for this month's challenge and perfect for my brother for his birthday.


Here is the card I created with this awesome digi.


I tried something a little different this time and used  Triblend markers to color the image.

Bike Metal, Tire, Jacket and Helmet: Ice Grey Blend

Skin: Fair Skin Blend

Pants: Twilight Sky Blend

Scarf: Burnt Orange Blend

Hair: Earth Brown Blend

Lights: Sand Blend

I fussy cut the image out and placed it on the card base using foam squares.  I used pattern paper from my stash to create the card base.  I then added some screw brads to the card panel for more interest.  To finish the card, I added the sentiment strip from Taylored Expressions- Simple Strips Birthday.

Now it is your turn.  Leave me a comment and then create a fun fold or fancy fold card and share it with us at Crafty Gals Corner. 


Wednesday, May 8, 2024

Crafty Gals Corner- Challenge


Hello Crafty Friends,

New month means a new challenge over at Crafty Gals Corner.   I am so anxious to share with you the image and card I created for this month's challenge. 

The digital stamp comes from Moondrea Designs entitled Gina Antoinette.


Here is the card I created using this super cute digi stamp.


I colored the image with my Copic Markers:

Hair: E37, E97, E31

Skin: E11, E21, E51, E50

Dress: BG09, BG07, BG02, BG000

Leaves: YG61, G21, G12

Flowers and Cupcake: RV95, RV11, RV00

Eyes: BG93, BG96, BG99

When I first colored the eyes, they were very dark, so I did take a little of the Colorless Blender and lighten them.  The really did lighten up after awhile.

I created the card base from pattern paper from Authentique's Classique: Elegant collection and some lace from my stash.

I finished the card with some pearls from Pink and Main and a sentiment strip from Taylored Expressions.

Thank you for stopping by.  Please leave me a comment and then share your project with us at Crafty Gals Corner Challenge Blog.


Here

Friday, March 1, 2024

Mix It up Challenge Blog- Fancy Folds Challenge


 Hello Crafty Friends,

New month and a new challenge at Mix it Up Challenge Blog.  We want to see your Fancy Fold cards.  I found this pattern on Pinterest and so had to create it.  I used pattern paper from my stash to create the base of the card. 

This is the front of the card.   I used a stamp from Pink and Main stamped in blue ink for the front of the card.


 There is a total of 3 panels and 2 folds.


 This is the final panel where you would write your message.  I used the ice cream cone stamp from Doodlebug and the sentiment from My Favorite Things.


The middle panel features a die cut ice cream cut with dies from Pink and Main.  I also used an embossing folder from Stampin Up to create the background.


 I finished the card by adding some rhinestones to the front, 

Now it is your turn.  Create a project with fancy folds and share it with us at Mix it Up Challenge Blog.

Monday, July 3, 2023

Mix it Up Challenge Blog- Apeture Challenge

Hello Crafty Friends,

We have a new challenge at Mix it Up and it is a fun one.  The challenge is to create a card with an aperture opening.  When I thought of this technique, I thought about a shaker, so that is what I did.


I created the card by first die cutting the Happy Birthday from the front of the card base and the card front at the same time.  On the back of the card front and the front of the card base, I placed acetate.  I then placed my foam tape around the opening and placed my shaker elements inside.  Here is what it looks like from the inside.


 To finish the card, I die cut the words from pink cardstock and cupcake pattern paper and adhered these to the card front.  To of my favorite things, shaker and simple.  I love it.

Now it is your turn to try this technique.  Share your project with us at Mix it Up Challenge blog.  Don't forget to leave me a comment.


Saturday, July 1, 2023

Love to Craft Challenge Blog- Anything Goes


 Hello Crafty Friends,

It is July 1st, can you believe it?  The summer is in full swing and it is a holiday weekend.  I have so many crafty projects I want to work on this weekend.

Today, I want to share my design team project for the challenge of Anything Goes over at Love to Craft Challenge Blog.

Here is the card I creating using all supplies from Taylored Expressions.

The card base was created using blue foil on the plaid foil its.  I then finished the plaid pattern with Cookie Monster and Peapod inks. I cut the panel with the frayed edge stacklets. 

I then stamped the Happy- On the Block- Happy Shadow with Cookie Monster ink and die cut with the matching die.   I then stamped the Birthday Wishes with All Together Occasions 2 stamp set. 

The panel was then matted with Peapod cardstock on a white card base.

I hope you join us for our challenge over at Love to Craft Challenge Blog.  Also, please leave me a comment.

Wednesday, September 14, 2022

Crafty Gals Corner Challenge # 235 Signs of Fall


Hello Crafty Friends,

The weather is finally cooling down in Southern California. I can see Fall on the horizon. As I colored this card, I was thinking about the cooler weather and all the sights, smells and sounds I look forward to in the coming weeks.

I got to color this adorable stamp from Crafty Sentiments Designs, titled Amy Looking in.  Isn't she just adorable?


Here is the card I created:


I colored the image with my copics:

Skin: E33, E13, E11, E21

Hair: E59, E08, E35

Shirt: E09, E03, E13, TR27, YR68, YR15

Pants: W3, B99, B97, B93, B91

Shoes: E29, E25, E23, E21

I used pattern paper from Photoplay's Fall Breeze collection.

The sentiment is from Spellbinders.

I hope you are excited to create your own project and share it with us at Crafty Gals Corner.  Please leave me a comment also. 

Saturday, September 3, 2022

Mix it Up! Optional Smooshing Technique


Hello Crafty Friends,

We have a new challenge at Mix it Up, where anything goes, but the optional twist is to do the smooshing technique. I have not done this technique very many times, so I was excited to get my fingers dirty.  

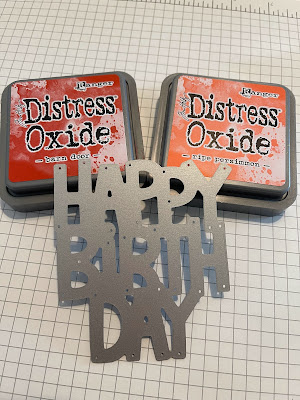
I started by creating the background with the following:

Using a large block, with the two Distress Oxides and some water, I created the background.  I then die cut the "Happy Birthday" from Lawn Fawn from a red and from a grey cardstock and adhered it to the background.

I finished the card by adding some "Tiny Birthday Friends" colored with my Copics to the card.

Thanks for stopping by.  Please leave me a comment. Then join the challenge at Mix it Up! Challenge blog.


Hello

Saturday, July 2, 2022

Mix it Up Challenge Blog- Twist: Clean and Simple


 Hello Crafty friends,

I am so excited to be on the design team for Mix it Up!  This is a new design team for me, but I am looking forward to sharing my designs with you where.

This month's theme is Anything Goes with the twist: Clean and Simple.

Here is the card that I created, which to me is clean and simple.


 I used some pattern paper from my stash to create the background of my card. I then stamped the deer (retired stamp set from Fun Stampers Journey) onto white cardstock using a brown ink.

I matted this image piece on a piece of brown cardstock and tied a brown twine knot around the whole piece.

I finished the cars by die cutting the letters HB from brown cardstock using the alphabet die set from Queen and Company. 

A clean and simple Masculine card for a man who is celebrating a birthday.

Thank you for stopping by.  Please leave me a comment.

Then head over to Mix it Up Challenge Blog and share your clean and simple card.

Monday, August 30, 2021

Bitten By the Bug 2: Birthday Card


Hello Crafty Friends,

We have a birthday theme over at Bitten By the Bug 2.  I wanted to play with my new paper pad from Michael's so I created this card.

I created the card base using cardstock and pattern paper from Michael's.  I then cut the words with my Cricut from the Celebrations cartridge.  I glued them to a piece of white cardstock and cut around them.

I added them to the card base using foam squares. 

I finished the card by adding a red piece of twine around the card and tied a bow.

Now it is your turn.  Create a birthday project and share it with us at Bitten By the Bug 2.

Thanks for stopping by.  Please leave me a comment.  


Wednesday, August 11, 2021

Crafty Gals Corner- Summer Fun Challenge

 Hello Crafty Friends,

We have a new challenge at Crafty Gals Corner and it was a fun one for me.  I received this adorable image to play with from Polkadoodle.

The name of this stamp is: Sunshine Delight Shopping Bliss-Winnie.   Isn't she the cutest? 

I colored her with my Copics:

Skin: E13, E11, E21

Hair: E29, E25, E35, E5`1

Pants, purse and fins: V17, V15, V12

Shirt and shoes: BG49, BG15, BG45

Leaves: YG13, YG11

Flowers: R56, RV34, R81, E93

I then created the card using pattern paper from Lawn Fawn ans Frank Garcia.  I stamped the birthday message from Spellbinders, twine from my stash and added some rainbow drops from Fun Stampers Journey.

I love the way she came out.  Now it is your turn.  Create a summer card and join the challenge at Crafty Gals Corner.

Thanks for stopping by.  Please leave me a comment. 


Sunday, June 6, 2021

Angie's Digital Stamps Challenge


Hello Crafty Friends,

Today we have a new challenge at Angie's Digital Stamps.  The theme is Anything Goes.  I got to color this beautiful digital stamp.

I colored the cake with my Copics:

Flowers: BG49, BG15, BG45

Diamonds: YR65, YR61

Heart: R83, R81

The card base was created with Cardstock from my stash and pattern paper from Authentic Classique: Elegent collection.

I then added rhinestones to the flowers and the circles between the diamonds.

Now it is your turn to create a card and share it with us at Angie's Digital Stamps Challenge Blog.

Friday, May 28, 2021

Stampin Friends Blog Hop: Masculine


Welcome to the Stampin Friends Blog Hop.  This month and the theme is Masculine makes. If you are following along the hop, you should have arrived from Steph Jandrow'sblog.  Make sure to read through my blog, comment below and then continue to Maureen Rauchfuss' blog.

If you get lost along the way, you can find a list of Blog Hoppers at the end of each blog.

Here are the projects I created for our Masculine theme.


I created this fun box card for a very special 5 year old that loves all things Star Wars.

The box card part was cut with my Cricut from Dreaming Tree. 

I then stamped the images from Kindred Stamps and colored them with my Copics.

The unique card needed an awesome envelope to put it in, so the project is the matching envelope from the same file.


Together they look very cute together.

Thanks for stopping by.  Please leave me a comment.

Here are the bloggers if you get lost. 

  1. Maureen Rauchfuss - US
  2. Katja Ettig 
  3. Jean Beaulieu
  4. Teri Pocock
  5. Tiziana Milano - US
  6. Steph Jandrow US
  7. Kim Lamos


Wednesday, March 10, 2021

Crafty Gals Corner- Make it Green!


 Hello Crafty Friends,

We have a very Green challenge at Crafty Gals Corner this month.  

I got to play with this sweet image from Polkadoodle.


Here is the card I created using the Dragon Onesie Little Dude image.


 For the background, I used an embossing folder from Stampin Up.  I then die cut a cloud from Jillibean Soup and the sentiment is from a die cut by Spellbinders.

I colored this image with my Copics: 

Dragon Outfit:  YG67, YG25, Y23, Y17, YG13, YG05

Skin: E13, E11, E21, E000

Hair: E35, E33

Here is a close up of the little dude:


I hope you will make something with green and join us at Crafty Gals Corner.

Thanks for stopping by.  Please leave me a comment.


Friday, March 5, 2021

Simply Create Too- Wet or Dry Embossing Challenge


 Hello Crafty Friends,

We have a new challenge at Simply Create Too!  The challenge this month is wet or dry embossing.  I tried a new technique to me, and I hope you like it.


 This is a very easy card, but I love the way it turned out,

I first took a few different green rolls of washi tape that I had in my stash and I placed them on a piece of White Cardstock.  I then wrapped the ends around the card face.

I then used an embossing folder with leaves on it and ran the whole card front through my machine using the embossing folder.

I then used foam squares to attach the panel to the card base.

Lastly, I die cut the words from an Impression Obsession die and added it to the card base.

That is it. Quick and easy and you could easily do the same technique with scraps of paper or cardstock.

Now let's see your creations.  Create something with wet or dry embossing and join the challenge at Simply Create Too.

Thanks for stopping by. Please leave me a comment.