Showing posts with label Die Cuts. Show all posts

Sunday, September 1, 2024

Merry Little Christmas Challenge Blog- Anything Goes


Hello Crafty Friends,

Today I am sharing a card I created using some products from Pink Fresh Studios.

The envelope is a die, which I cut out and then stenciled the outline detail with red ink.

I then stamped the gifts and greenery stamps with black ink and stenciled them with the stencil set.  I then die cut them out and created this arrangement with the images.

I stamped and die cut the sentiment and popped it up on the envelope.

I finished the card by adding the envelope to a piece of pine needle paper from my stash.

I also created a "green" one too.


Thanks for stopping by.  Please leave me a comment and then join the challenge at Merry Little Christmas Challenge Blog.


Wednesday, May 1, 2024

Merry Little Christmas Challenge Blog


Hello Crafty Friends,

New month and a new Christmas card to share.  I created this card for a swap I was a part of and ended up making 12 of these.  Lots of work, but so worth it.


This card was created with the Spellbinders "Winter Label Motif" die set.  I cut each piece out using paper in my stash and layered them up. 

The card base was created using an embossing folder from Stampin Up.  I then used some teal paper and a white grosgrain ribbon to create the bow.

Not a lot of instructions, but a stunning card if I might say.

Now, it is your turn, create a Christmas card and join us for the challenge at Merry Little Christmas Challenge Blog.  Also, don't forget to leave me a comment. 

Mix it Up Challenge Blog- Inlaid Die Cut Challenge


Hello Crafty Friends,

We have a new challenge at Mix it Up Challenge blog and when I heard the theme, I knew exactly what die I wanted to use.  The challenge this month is Inlaid Die Cut either raised of flat.  I pulled out this old die set from Fun Stampers Journey and went to work.


Yes, this card too some time, but the results are stunning and the recipient will appreciate it. 

Here is how I created this card.  I first cut the card front pieces in grey, blue, green and pink. I added sticker paper to each one. I then die cut the card front piece 4 times.  Then the fun began.

I took the grey piece and attached it to a piece of copier paper. I then took the pieces from the other card fronts and laid them into where the color should be.  Each individual piece.  I love the way it turned out.

I finished the card by adding a label die cut with my sentiment on it with a strip of white cardstock underneath to the card front.  

Thank you for stopping by. Please join the challenge st Mix it Up Challenge Blog and leave me a comment as well.

Monday, January 1, 2024

Merry Little Christmas Challenge Blog- Anything Christmas


Hello Crafty Friends,

It is hard to believe that we are upon a new year.  This past Christmas I attended a retreat where the theme was gingerbreads.  I created this card using dies from Doodlebug,


To add some depth, I cut out a frame with a die from Taylored Expressions and a piece of Doodlebug's Gingerbread Kisses line of pattern paper.  

I dies cut and sponged the sides of the gingerbread and tree cookies to give them some depth.  I also added some pink ink to Santa's cheeks.

I know Christmas just past, but to be ready for next year, start working on your Christmas cards now and share them with us over at the Merry Little Christmas Challenge Blog

Then please leave me a comment.

Love to Craft Challenge Blog- Anything Goes


Hello Crafty Friends,

Happy New Year! I want to share a project I created for my Besties this past Christmas.  I created this 3-D crafty tote using dies from ScrapDiva. 

I embellished the tote with pattern paper from Doodlebug. This is looking at the useful pocket side. The pocket is created using an extra piece of cardstock.


This is looking at the opposite side

Here is a look from the top

 
You can see on the left side the two pockets I created with some extra cardstock, that makes them useful.  I then used some flocked texture cardstock from Doodlebug to line the inside the bag. 
I stuffed the totes with embellishments, candy, socks and chapstick.
 
Thank you for stopping by.  Please leave a comment and then join us with your crafty project at Love to Craft Challenge Blog. 


Friday, September 1, 2023

Love to Craft- September Challenge


Hello Crafty Friends,

New month, means a new challenge at Love to Craft Challenge Blog.  As always, the theme is Anything Goes. This month I broke out this cute stamp from Kindred Stamps titled "Play Pretend".


This card was fun to color and was made especially for someone.

I colored the image with Copics:

Skin: E13, E11, E21

Hair: T7, T5, T3

Sweater: R59, R46, R24

Mouth: RV13

Crown: Y28

Pants: B99, B79

Shoes: B34

King's Outfit: BG49

Thank you for stopping by and checking out my work.  Please leave me a comment and then come join the challenge at Love to Craft Challenge Blog.

Sunday, July 2, 2023

Merry Little Christmas Challenge Blog


Hello Crafty Friends,

It is July and we are half way to the Christmas season. Creating Christmas cards is my favorite thing to do. I created this Christmas card for a swap I was in.

All supplies are from Kindred Stamps. This was a limited edition Christmas set a year ago, so it may not be available, but I had to create this cute castle, with my favorite guy out front. 

The castle is made with 15 different pieces of cardstock and glitter cardstock. The garland and Mickey wreath are another two layers. 

I stamped and colored the Mickey with my Copics.

To finish the card, I added a bow to the wreath.

I hope you are creating Christmas cards a little at a time throughout the year so you have a nice "stash" by the end of the year.  Share some of them with us at Merry Little Christmas Challenge Blog and leave me a comment too. 


Here

Monday, January 2, 2023

Mix-it Up Challenge Blog- Anything Goes with optional twist


Today we have a challenge have a new challenge at Mix it Up Challenge Blog.  The theme is anything goes with an optional twist of no stamping.

The card I created, had a stamped sentiment, but the majority of the card is die cut. 

I created the background of the card using the Gingerbread House paper pack from Echo Park.  I then used a new die to me by Sizzix, to create the reindeer.  I added some white ink to his eyes and used a black sharpie for the mouth.

To finish the card, I stamped the sentiment from Simple Stories with brown ink and cut the banner piece.

Thanks for visiting.  Please leave me a comment and then come join the challenge with us at Mix It Up Challenge Blog.


Saturday, September 3, 2022

Mix it Up! Optional Smooshing Technique


Hello Crafty Friends,

We have a new challenge at Mix it Up, where anything goes, but the optional twist is to do the smooshing technique. I have not done this technique very many times, so I was excited to get my fingers dirty.  

I started by creating the background with the following:

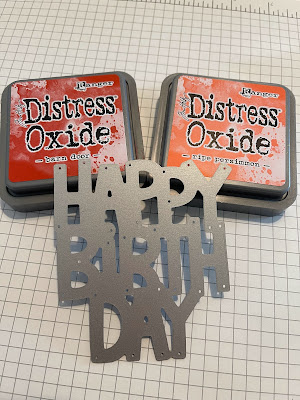
Using a large block, with the two Distress Oxides and some water, I created the background.  I then die cut the "Happy Birthday" from Lawn Fawn from a red and from a grey cardstock and adhered it to the background.

I finished the card by adding some "Tiny Birthday Friends" colored with my Copics to the card.

Thanks for stopping by.  Please leave me a comment. Then join the challenge at Mix it Up! Challenge blog.


Hello

Monday, October 4, 2021

Get Creative Challenge Blog- Holidays theme


Hello Crafty Friends,

I am so glad to be creating with Christmas items.  I love Christmas and just love to craft Christmas cards, home decor and anything!  

I absolutely fell in love with this little deer "Rudolph" from Oddball Art.


 Here is the cute card I created:

I colored Rudolph with my Copic Markers:

Body: E29, E25, E23, E21

Scarf: R59, R46

Ears: RV34, R81

To create the card I used Kraft paper for the base of the card, then used pattern paper from Carta Bella Christmas Paper pad.  I then die cut the scallop with white cardstock and a die from Fun Stampers Journey.

To finish the card, I added a bow and some red rhinestones.

Thank you for stopping by.  Please leave me a comment.  Then create your own holiday project and share it with us at Get Creative Challenge Blog.


Saturday, September 4, 2021

Simply Create Too- Fall Leaves Theme


Hello Crafty Friends,

We have a new challenge at Simple Create Too.  One of my favorite things this time of year, Fall Leaves!  I love the colors of fall and everything the fall season brings.

The card I created is full of fall leaves.


I started the card with cardstock from Fun Stampers Journey and a top layer of pattern paper from Photo Play- Fall Breezes.

I then die cut the word thanks from Fun Stampers Journey and added some leaves from dies from Rubbernecker Stamps.

I think it screams fall, don't you?

Now it is your turn.  Create a project with fall leaves and join us at Simple Create Too.

Thank you for stopping by.  Please leave me a comment. 

Wednesday, June 9, 2021

Crafty Gals Corner- For the Boys


Hello Crafty Friends,

For the Boys is the theme of this month's challenge at Crafty Gals Corner.  I was drawn to this beautiful digital stamp by Pattie's Creation Digital Images and couldn't want to color it up. 

 I colored the image with my Copics.


Flowers: Y19, Y15, Y11

Leaves: YG13, YG11

I then cut out the one side of the image and mounted the image on a piece of Authentique Classique: Elegant pattern paper and then matted that on cardstock from my stash.

I die cut the sentiment from a die in my stash (not sure where I got it) out of Black cardstock.  

To finish the card, I added some black enamel dots to the corners.

Thank you for stopping by and leave me a comment.  Then come join the challenge with us at Crafty Gals Corner.  


Friday, November 27, 2020

Fall Porch Card

 Hello Crafty Friends,

The day after Thanksgiving for most is the day for shopping deals and Black Friday madness.  For me, I tend to stay home and cherish the last few days of the fall colors and smells.

I love Thanksgiving and all the colors that come with fall, but my favorite season is Christmas and I will spend today decorating for Christmas.

Before fall is gone, I have one more card to share.


I started out with a piece of Butter Cream cardstock from Fun Stampers Journey, which I scored at every half inch to make the background look like ship lap walls.

I then die cut the window from the Window View die from Fun Stampers Journey and placed a piece of Kiwi Slice cardstock to the back of the window.  

I then used leaves from Rubbernecker Stamps die and made the wreath for the window,  The word fall was die cut from Summer Days Cardstock from Fun Stampers Journey and the Snapshot frames die set.

To finish the card I added a twine bow to the wreath and added the little pumpkin sticker from Doodlebug to the window.

Thanks for stopping by.  Please leave me a comment. 

Thursday, November 19, 2020

Stampin Friends Blog Hop: Happy Holidays


Hello Crafty Friends,

Welcome to the Stampin Friends Blog Hop! This month’s theme is Happy Holidays.  If you are following along the hop, you have arrived from Jean's blog. Be sure to read through my blog, comment below and continue to Heidi's blog. If you get lost along the way, you can find a list of Blog Hoppers at the end of each Blog.

Here are the Holiday projects I created for this month’s hop.
 
Up first is the card I created. 


I used cardstock from Fun Stanmpers Journey and pattern paper from Photo Play to create the base of the card.  
 
I then stamped this cute little Santa from Kindred Stamps onto a piece of Cardstock and colored him with my Copics.
Hat, Jacket, Pants: R39, R35, R29
Beard, eyebrows and mustache: C1, C00
Boots: 100
Skin: E21, E00
Buckle: Y28
Bag: G94, G24

 I then die cut the circle from Circle Around die set from Fun Stampers Journey and popped Santa on top of the circle.

To finish the card, I added a twine bow and little paper flags.  I then stamped the sentiment from Kindred Stamps with Cranberry Bliss ink from Fun Stampers Journey.  Then I added some white glitter Stickles to his hat and suit for fun.
 
For my project, I created a little mini mailbox for letters to Santa.
 

I used a svg file from Lori Whitlock to create the mini mailbox.  I cut the mailbox at 2 inches high, so it was proportional to Santa.  I placed a Hershey's Kiss inside the mailbox to be used as a treat box.    
I colored Santa the same way as above.

Here are the card and mailbox together.


  I hope you liked the projects I shared and you will have some ideas after continuing with the hop.  Please leave me a comment and keep on hopping.
  1. Steph Jandrow (US)
  2. Tiziana Milano (US)
  3. Lisa Ann Bernard - Queen B Creations (US)
  4. Katja Ettig (GER)
  5. Teri Pocock
  6. Sue Vine - MissPinksCraftSpot (Australia)
  7. Jean Bolen Beaulieu
  8. Kim Lamos- You are here!
  9. Heidi Collins (US)
  10. Kim Quade (US)
  11. Maureen Rauchfuss (US) 
  12. Barbara Welch (US) 
  13. Anne Marie Hile (US)
  14. Melissa Thomas (US)

Saturday, November 7, 2020

Coffee Loving Cardmakers Blog Hop-Smile


 Hello Crafty Friends,

It is the Fall/Winter Coffee Lovers Blog Hop and I couldn't wait to pull out my coffee die cuts and stamps.


I created this quite simple card using Doodlebug Designs pattern paper.  I then die cut the circle from Journey Circles and the Coffee cup from the Coffee First dies set, both from Fun Stampers Journey.

I stamped the sentiment from the Lawn Fawn set, Love you a Latte, using Hazelnut Blend ink from Fun Stampers Journey.  I then added some matching stickers from Doodlebug Designs to finish off the card.

Thanks for stopping by.  Please leave me a comment.

Thursday, November 5, 2020

Thanks so much

 Hello Crafty Friends,

I recently got a new stamp set from Simple Stories and I could not wait to ink it up.  I saw a card in an old Stampin' Up catalog that I had to try, so here is my version.

I started the card by die cutting many leaves using a die set from Cuttlebug and using Pomegranate Splash cardstock from Fun Stampers Journey.  I then created a pattern with the leaves and this became the background for the card.

Next, I die cut the circle with the Circle Around die set from Whip Cream Cardstock, both from Fun Stampers Journey.  I stamped the truck and added the sentiment from the same stamp set to the back of the truck.

I colored the truck with my Copics:

Truck: R39, R37

Tires: C9, C7

Apples: R29, R24

Bumper: C5, C3

To finish the card, I added a Cocoa Powder Gingham ribbon tied into a knot around the card.

Thanks for stopping by.  Please leave me a comment.

Wednesday, October 28, 2020

Birch Trees and Leaves

 Hello Crafty Friends,

I am loving the cooler weather here in Southern California, but it did not stay long enough.  We are reaching the 80's now and into the high 80's this week.

I love Fall, with it's cooler weather, colors and smells.  I couldn't wait to start creating my Fall cards.  Today is the first.

The card base is stamped with the Birch Tree background stamp from Fun Stampers Journey with Hazelnut Blend ink on Oatmeal Cookie Cardstock.

I then die cut some leaves and the acorn using a Cuttlebug die set and Green Olive, Tangerine Fusion, Oatmeal Cookie and Hazelnut Blend cardstock from Fun Stampers Journey.  I distressed the leaves with a little Hazelnut Blend ink.

I tied the leaves and acorn together with some gold and white twine from my stash and attached the cluster to the card using foam squares.

Happy Fall!

Thank you for stopping by.  Please leave me a comment.

Sunday, October 11, 2020

Boo! House

 Hello Crafty Friends,

Creating another Halloween card using my favorite paper line, Doodlebug Designs.


I used solid cardstock from Fun Stampers Journey and pattern paper from Doodlebug Designs to create the card base.  The picture of the house is an icon from the Doodlebug Designs collection.

I added the die cut Boo! cut from Black Licorice Cardstock and the Snapshot Frames Die set.  The spider is part of the matching stickers for the collection.

To finish the card, I added Journey Glaze from Fun Stampers Journey to the windows of the house.

Thanks for stopping by.  Please leave me a comment.

Thursday, September 10, 2020

Forever Fern Hello Card

 Hello Crafty Friends,

I have been playing with the Forever Fern bundle from Stampin Up.  I found this card on Pinterest, and loved it because of the ring.

All supplies from Stampin Up.

Thank you for stopping by.  Please leave me a comment. 

Tuesday, September 8, 2020

Summer Embellishment Swap

 Hello Crafty Friends,

Recently, in my crop group, we had an embellishment swap.  My partner loves blue and yellow and makes cards, so I made some embellishments she could use on her cards.  

Here are the embellishments I made for her.

I used pattern paper from my stash and used cardstock from Fun Stampers Journey.  

Here is a close up of each of the pieces.

I used Journey Scallops, Catalina Splash Satin Ribbon, Black Licorice and sentiment are from Fun Stampers Journey.

I used Journey Hexagons, Baby Envelope and sentiment are from Fun Stampers Journey.

Made these bows with Baby Bow die from Fun Stampers Journey.

Flower stamp, sentiment, washi tape, twine and ribbon are from Fun Stampers Journey.

I had fun creating these and she loved them.

Thank you for stopping by.  Please leave me a comment.