Showing posts with label Stampin Up. Show all posts

Wednesday, April 9, 2025

Crafty Gals Corner- Challenge # 266- Fill in the Blank: Adorable__________


Hello Crafty Friends,

I am sure you have noticed that we have a new look with new graphics at Crafty Gals Corner.  I love the cherry blossoms and the fresh new look.  We still are the same group of designers and crafty gals, just with a new fresh look. 

Our challenge this month is Fill in the blank: Adorable _________.

The stamp I received to color up this month is from Poladoodle entitled "Party Balloon Bunny".  I think she is adorable and why I chose her for our challenge this month.


Here is the card I created. 


My color inspiration came from the Echo Park paper pack "Happy Birthday". Once I had picked the paper, I matched the solid papers and began coloring using my Copic Markers.
 
Fur: E57, E23, E34
Ears: E23, E34, RV34, RV10
Tutu and Balloon: BV17, BV13, BV02
Flowers: R89, R85, R83
Leaves: G99, G94, YG03, G28, G24
 
I used a label die from Stampin Up to cut out the bunny for my focal point.  I added some lace from my stash also.  To finish the card, I added the sentiment sticker from the paper pack and some peals from Pink and Main,  
She is ready for her next party and she is adorable.
 
Now it is your turn. Leave me a comment and then go and share an "adorable" project with us over at Crafty Gals Corner. 


Wednesday, November 13, 2024

Crafty Gals Corner Challenge #261- Anything goes with 3+ layers


Hello Crafty Friends,

It is a new challenge over at Crafty Gals Corner. This month the challenge is Anything Goes with 3+ layers.  I received this adorable digital stamp titled "Ginger Hot Tub Image #230, from SheepSki Designs to create with,

I immediately got my Copics out and started coloring this adorable image. 

I used the Authentique "Rejoice" paper pack, so I coordinated my colors with the paper pack.

Copics I used:

Coca: E29, E25, E23

Gingerbreads: E09, E13

Santa Hat: R56, R46

Eyes: E57, E23

Buttons and Cup: G28, G24

Here is a close up of the colored image.

I layered the sentiment boxes that came with the paper pack on the left side.  I then distressed all the way around the card.  

I added my image after die cutting it into a circle shape.  I stamped the sentiment from Taylored Expressions.

To finished the card I added some ribbon and twine and then tied on these cute charms I had in my stash from Stampin Up.


I know exactly who is getting this card this year.  Now it is your turn.  Create a project with 3+ layers and share it with us at Crafty Gals Corner. 

I would also appreciate if you would leave me a comment.  Thank you.


Friday, March 1, 2024

Mix It up Challenge Blog- Fancy Folds Challenge


 Hello Crafty Friends,

New month and a new challenge at Mix it Up Challenge Blog.  We want to see your Fancy Fold cards.  I found this pattern on Pinterest and so had to create it.  I used pattern paper from my stash to create the base of the card. 

This is the front of the card.   I used a stamp from Pink and Main stamped in blue ink for the front of the card.


 There is a total of 3 panels and 2 folds.


 This is the final panel where you would write your message.  I used the ice cream cone stamp from Doodlebug and the sentiment from My Favorite Things.


The middle panel features a die cut ice cream cut with dies from Pink and Main.  I also used an embossing folder from Stampin Up to create the background.


 I finished the card by adding some rhinestones to the front, 

Now it is your turn.  Create a project with fancy folds and share it with us at Mix it Up Challenge Blog.

Friday, March 3, 2023

Love to Craft Challenge Blog


Hello Crafty Friends,

If you love to craft then this is the blog challenge for you.  Anything goes is the theme every month and the best part of the challenge is to see what everyone comes up with.

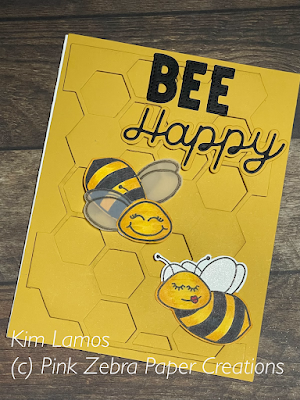
This month, I created a fun card that could be easily used as a Valentine's card as well.

I used a mustard colored cardstock to create the background and then cute from the same colored cardstock to cut out the hexagon background die.

I then stamped with black ink on white cardstock, the bees from Honey Bee stamps and detail cut them out and colored with markers.

I stamped the one set of wings for one bee on vellum and detail cut them out and added them.

The sentiment was die cut with a die from Photoplay.

To finish the card I added some Wink of Stella on the wings of the "white" wing bee.

Thank you for stopping by.  Please leave me a comment and then join the challenge at Love to Craft Challenge Blog.

Thursday, November 3, 2022

Merry Little Christmas Challenge Blog


 Hello Crafty Friends,

We are one more month closer to the Christmas season.  It also means I get to share another Christmas Card I created.

Here is the card I created using a stamp set from Stampin' Up.


I am not really into the Santa part of Christmas, but I think this set and card are cute.

I first stamped the border images with black ink on white cardstock.  I then stamped the solid part of the image with red/black.  I then cut out the images by fussy cutting.

I added the twine to the card and then stamped the clothes pins in a soft brown color.  I then clipped the articles of clothing on the line.

I finished the card off, by adding the sentiment at the bottom.

I love Christmas and love to create Christmas cards.  Please leave me a comment and then create a Christmas card of your own and share it with us at Merry Little Christmas Challenge Blog


Friday, September 2, 2022

Merry Little Christmas Challenge


Hello Crafty Friends,

We have a new challenge at Merry Little Christmas.  We always challenge you to make Christmas cards. In Southern California we are melting with temperatures up to 110 degrees in some areas.  It is hard to think about the cold snow of Christmas, but getting one more card done is great. 

I created this card using a retired Stampin' Up stamp set.  I loved this stamp set because of the door and how welcoming this would be to walk up to.

For the pattern paper I used a piece from a Recollections pad I got at Michael's.  I used my colored pencils to color the greenery.

To finish the card, I stamped the sentiment on a small piece of white cardstock and then added a black twine bow and added it to the "sign".

Thanks for stopping by.  Please leave me a comment.  Then join the challenge at Merry Little Christmas Challenge blog and get done more card done.

Wednesday, March 10, 2021

Crafty Gals Corner- Make it Green!


 Hello Crafty Friends,

We have a very Green challenge at Crafty Gals Corner this month.  

I got to play with this sweet image from Polkadoodle.


Here is the card I created using the Dragon Onesie Little Dude image.


 For the background, I used an embossing folder from Stampin Up.  I then die cut a cloud from Jillibean Soup and the sentiment is from a die cut by Spellbinders.

I colored this image with my Copics: 

Dragon Outfit:  YG67, YG25, Y23, Y17, YG13, YG05

Skin: E13, E11, E21, E000

Hair: E35, E33

Here is a close up of the little dude:


I hope you will make something with green and join us at Crafty Gals Corner.

Thanks for stopping by.  Please leave me a comment.


Friday, January 8, 2021

Forever Fern Thank you

 Hello Crafty Friends,

It is the end of the first week of the new year.  How are you doing with your goals?  I am doing pretty well.  I have not been crafting very much because school is back in session, but I so look forward to the weekends so I can craft.

Today, I want to share a card I created for a recent order for thank you cards.

I have used this Forever Fern bundle from Stampin Up! for so many different cards and I pulled it out again for this order of thank you cards.

All supplies are from Stampin Up! except the Whip Cream Cardstock, Blue Lagoon ink and Treat Label Die all from Fun Stampers Journey.

Thanks for stopping by.  Please leave me a comment. 


Sunday, December 13, 2020

Merry Christmas

 Hello Crafty Friends,

I hope you are having fun getting ready for Christmas, even though Christmas is a little different this year.

Today I want to share a Christmas card I created mainly with the Forever Fern Bundle from Stampin Up!

I started the card using Cranberry Bliss Cardstock and a piece of pine pattern paper from my stash.   I then took one of the gold element frames and backed it with Whip Cream Cardstock from Fun Stampers Journey.  

I die cut some of the little greenery from the Stampin Up Forever Fern bundle die set with Fresh Forest Cardstock from Fun Stampers Journey.  I stamped some of the berries with Cranberry Bliss ink and die cut the berries with the matching die.

I stamped the sentiment from the Sparkle Trim stamp set with Cranberry Bliss ink.

I finished the card by adding a few red rhinestones.

Thank you for stopping by. Please leave me a comment.


Friday, December 11, 2020

Happy Holidays

Hello Crafty Friends,

The Forever Fern bundle is so versatile and can be used for different holidays.  I have another Christmas card to share with you that I created with the Forever Fern Bundle from Stampin Up!


I started the card with a card base of Whip Cream cardstock and a layer of Fresh Forest Cardstock both from Fun Stampers Journey.

I then embossed a piece of Whip Cream Cardstock with the matching embossing folder for the bundle.  I matched this with a piece of the fern pattern paper and made the top layer of the card.

I then added a gold fern element, die cut leaves from Fresh Forest cardstock and the berries, stamped with Cranberry Bliss ink from Fun Stampers Journey and die cut with the matching die.  The berries are attached to the card using foam squares.

I added a gold twine bow around the whole card and the sentiment stamped with Cranberry Bliss ink from the Sparkle Trim stamp set from Fun Stampers Journey.

Thank you stopping by.  Please leave me a comment.

Saturday, December 5, 2020

Merry and Bright

 Hello Crafty Friends,

I am loving the Forever Fern Bundle from Stampin Up and today I am sharing a Christmas card I created with this bundle.

I stamped the green leaves and the speckles onto the Whip Cream Cardstock.  I then stamped the red berries on Whip Cream cardstock and die cut them out.  I then die cut the leaves from the same bundle with Fresh Forest Cardstock.  

I then layered everything on to the card front.  I stamped the sentiment from a stamp set from Kindred Stamps with Cranberry Bliss ink from Fun Stampers Journey.  

The pattern paper strip is from Authentique.  I finished the card by adding a few red rhinestones.

Thanks for stopping by.  Please leave me a comment.

Thursday, December 3, 2020

Seasons Greetings

 Hello Crafty Friends,

Can you believe it is December and Christmas will be here before we know it.  I am busily working on my Christmas cards. 

When I saw this Forever Fern Bundle from Stampin Up! I fell in love with it.  I had fun playing with this bundle in August, but I brought it out for some Christmas cards.

I used Fresh Forest cardstock and Whip Cream Cardstock from Fun Stampers Journey.  I used the coordinating embossing folder to create the white background.  

I then used one of the gold elements to create the wreath, where I added some green leaves to the bottom and red rhinestones around the wreath.

I then stamped the greetings from the Sparkle Trim set with Cranberry Bliss ink, both from Fun Stampers Journey.

To finish the card, I added a gold twine bow to the bottom of the wreath.

Thanks for stopping by.  Please leave me a comment.


Tuesday, December 1, 2020

Love to Craft Challenge Blog- December Challenge


Hello Crafty Friends,

New month, means a new challenge at Love to Craft Challenge Blog.   This month of course I had to create a Christmas card to share.

I used the Stampin Up Forever Fern bundle to create this card.


I started the card by layering Whip Cream and Fresh Forest cardstock from Fun Stampers Journey, with a layer of Forever Fern pattern paper.

I then took the rings and tied them together with the gold twine and added them to the card.

I die cut the green leaves from the matching die set and placed those in the middle with the gold element.  I then added a Candy Apple Satin ribbon knot to the top.

To finish the card, I stamped the sentiment from my stash with Cranberry Bliss ink on Whip Cream Cardstock and then cut the banner end on the strip.  I added the sentiment to the card using foam squares.

Thanks for stopping by.  Please leave me a comment.  Then create a project and share it with us at Love to Craft Challenge Blog.

Sunday, November 15, 2020

Autumn Fox

 Hello Crafty Friends,

I have a great Fall card today, with a fox as the star of the show.

I saw this card layout in an old Stampin Up catalog and had to try it.

I used pattern paper from Frank Garcia's Amber Moom collection.  I stamped the fox from the Thankful Friends stamp set from Fun Stampers Journey with Hazelnut Blend ink on Butter Cream Cardstock.

I stamped the sentiment from the Happy Harvest stamp set from Fun Stampers Journey onto Tangerine Fusion Cardstock, also from Fun Stampers Journey.

To finish the card, I added a Pumpkin Patch ribbon flag to the left side and a few Rainbow Drops to the right side.

Thanks for stopping by.  Please leave me a comment.

Wednesday, September 30, 2020

Forever Fern Birthday

Hello Crafty Friends,

September is coming to an end and I have one last Forever Fern card to share with you.


I have loved working with this Bundle.  I used the gold elements included with the bundle to hold the sentiment I stamped from Fun Stampers Journey.  

I then stamped the inside of the card to  match.

I love this bundle and will use it again.

Thanks for stopping by.  Please leave me a comment.


Friday, September 25, 2020

Love and Laughter Forever

 Hello Crafty Friends,

Today's card is a rather simple one, but one that is quite elegant.

Stampin up as part of the Forever Fern bundle have two long and skinny embossing folders.  I took the leaf one and ran it across the card base.  I thought it added some texture to the cardbase.

I then layered the white cardstock and pattern paper on top with foam squares.  Next, I stamped my sentiment and added it to the card,  The pattern paper in this bundle is gorgeous, so I wanted to feature it.

Thanks for stopping by,  Please leave me a comment. 


Wednesday, September 23, 2020

Hello Ring Card

 Hello Crafty Friends,

Today I have a card I fell in love with on Pinterest.  Have you ever had a moment when you are looking through Pinterest and say to yourself, I have to make that card.  This was one of them for me.

I am not sure if it was the ring or just the layout with the swatches of different greens, but I loved and made it right away.

I used the Stampin Up Forever Fern bundle.  

Thanks for stopping by.  Please leave me a comment.


Monday, September 21, 2020

Leaves to a Good Friend

Hello Crafty Friends,

Today, I have a fun technique card to share.  


You first start with a piece of cardstock cut 4 1/4 x 11 and fold in half as usual.

Then you cut from one side a piece measuring 3 3/4 inches, give or take.  Then take this piece and cut it in half.  One of these pieces becomes the bottom and one of the pieces becomes the vertical piece that holds the bottom piece on. 

The inside of the card will look like this.


Then decorate as desired.  Here, I used pieces from the Forever Fern bundle from Stampin Up. 

Thanks for stopping by.  Please leave me a comment. 

Saturday, September 19, 2020

You can do this Forever Fern

 Hello Crafty Friends,

I am continuing with more projects with Forever Fern Bundle from Stampin Up.

I love the simplicity and elegance of just using a few colors on a card.

Thanks for stopping byl. Please leave me a comment. 

Wednesday, September 16, 2020

Forever Fern Friendship Card

 Hello Crafty Friends,

I am having so much fun with the Forever Fern Bundle from Stampin Up!  I have another fun card today.

This card is a fun fold and opens up on a diagonal.

The card is created by cutting a piece of 8 1/2 x 11 cardstock diagonally from corner to corner.  Since you are cutting the piece in half, you actually get two cards out of one piece of cardstock.

I think the gold element in this card really sets the card a part.

Thanks for stopping by.  Please leave me a comment.