Showing posts with label Technique. Show all posts

Friday, November 1, 2024

Mix It Up Challenge Blog- Challenge- Paper Piecing


Hello Crafty Friends,

Have you ever paper pieced an image before?  I loved creating those paper dolls from the Cricut cartrudge many years back, which I still have, to create cute little people.  Not quite the same thing, but so much fun. If you do, that is the challenge at Mix It Up Challenge Blog this month; Paper Piecing,

 I used the birthday stamp from Simon Says stamps to paper piece the balloons for a cute birthday card.

Here is the card I created:


I stamped the image 3 times, 2 times on the card front and one time on a scrap piece of the same blue cardstock.  I then stamped the image several times on different colors of cardstock.  I then cut out each balloon and party popper with the color I wanted.  I glued all the pieces to the individual stamped image.  I then popped this image up on the card front.

To finish the card, I layered the card front on another piece of blue cardstock.  I also stamped the sentiment from Taylored Expressions in black ink at the top. 

I hope you try paper piecing if you have never tried it.  Please leave me a comment and then join the challenge at Mix It Up Challenge Blog.

Monday, July 1, 2024

Mix it Up Challenge Blog- with a veggie stamping twist


Hello Crafty Friends,

This month's challenge over at the Mix it Up Challenge Blog was a new one for me. I have never tried stamping with a vegetable.  Unfortunately, I only had baby carrots in my refrigerator, so that is what I used,

I started out with a white piece of cardstock.  I then blended three colors from Taylored Expression inks: Blueberry, Cotton Candy and Gumball.   


I then used Versafine Clair and the three different sizes and colors of carrots to create the polka dots on the background.

After I made the background, here is the card I created.  


I stamped the sentiment from Photo Play on white cardstock and cut the end into a point.  I then die cute the word awesome form the same set using black and white cardstock.   To finish the card, I matted the card front to a piece of black cardstock.

I think I see more vegetable stamping in my future.  This is definitely a technique I want to t5y again and see what backgrounds I can create.

Now it is your turn.  Please leave me a comment and then create a card and try veggie stamping and then share your creation at Mix it Up Challenge Blog


Wednesday, May 1, 2024

Mix it Up Challenge Blog- Inlaid Die Cut Challenge


Hello Crafty Friends,

We have a new challenge at Mix it Up Challenge blog and when I heard the theme, I knew exactly what die I wanted to use.  The challenge this month is Inlaid Die Cut either raised of flat.  I pulled out this old die set from Fun Stampers Journey and went to work.


Yes, this card too some time, but the results are stunning and the recipient will appreciate it. 

Here is how I created this card.  I first cut the card front pieces in grey, blue, green and pink. I added sticker paper to each one. I then die cut the card front piece 4 times.  Then the fun began.

I took the grey piece and attached it to a piece of copier paper. I then took the pieces from the other card fronts and laid them into where the color should be.  Each individual piece.  I love the way it turned out.

I finished the card by adding a label die cut with my sentiment on it with a strip of white cardstock underneath to the card front.  

Thank you for stopping by. Please join the challenge st Mix it Up Challenge Blog and leave me a comment as well.

Love to Craft Challenge Blog-Anything Goes


Hello Crafty Friends,

New month and new challenges coming this week. Love to Craft Challenge Blog is up and I am sharing a new to me technique.  I am not even sure what it is called, but I new it looked very springy,


Here is how I created this card.  I first folded the card base of 4 1/4 x 11 in half.  I then trimmed off 6 half inch pieces off the bottom.  

Using washi tape, i aligned four of the strips to make the "card base" again, leaving spaces in between.  I then glued the remaining pieces to be the posts of the fence to either side, leaving small portion hanging off the bottom, which I cut off.

I stamped and colored the images from Taylored Expressions.  I then stamped the sentiment from Pink and Main and matted it with purple cardstock. 

I love the way it came out and hope you do too.

Please join the challenge at Love to Craft Challenge blog and leave me a comment also.


Friday, March 1, 2024

Mix It up Challenge Blog- Fancy Folds Challenge


 Hello Crafty Friends,

New month and a new challenge at Mix it Up Challenge Blog.  We want to see your Fancy Fold cards.  I found this pattern on Pinterest and so had to create it.  I used pattern paper from my stash to create the base of the card. 

This is the front of the card.   I used a stamp from Pink and Main stamped in blue ink for the front of the card.


 There is a total of 3 panels and 2 folds.


 This is the final panel where you would write your message.  I used the ice cream cone stamp from Doodlebug and the sentiment from My Favorite Things.


The middle panel features a die cut ice cream cut with dies from Pink and Main.  I also used an embossing folder from Stampin Up to create the background.


 I finished the card by adding some rhinestones to the front, 

Now it is your turn.  Create a project with fancy folds and share it with us at Mix it Up Challenge Blog.

Monday, January 1, 2024

Mix It Up Challenge Blog- optional Mixed Media


Hello Crafty Friends,

Happy New Year! A new year is upon us and makes me think about all the things I want to learn in the new year. Our challenge this month is one I would love to learn more about- mixed media. Here is the card I created to get my feet wet.


I saw this card on a video from Taylored Expressions and thought I would try it. I loved the colors, which drew me to the card.

I first stamped the Winter Village image and stamped it on the white cardstock with Clear Versamark.  I then used white embossing powder to heat emboss the image.

Then I took my blender brushes and two different blue inks and created the background.

To finish the card, I stamped the sentiment from the Merriest Christmas stamp set with the darkest blue ink.  I then splattered white paint and some glitter to create the stars.

Thank you for stopping by,  Please leave me a comment and then join the challenge at Mix it Up Challenge Blog.

Sunday, September 3, 2023

Mix it Up Challenge Blog with a Twist- Create your own background


Hello Crafty Friends,

New month means new challenge st Mix it Up Challenge blog.  This month the challenge is anything goes, with a twist- create your own background.

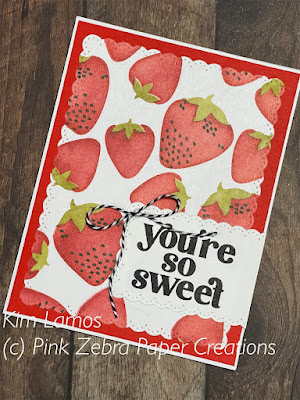
I knew exactly what I was going to do.  My favorite fruit in summer is Strawberries!  This super cute stencil was a freebie from Taylored Expressions and I couldn't wait to ink it up!

 
I used 2 red colors and 1 green color of stamp pad I have on hand.  I placed each stencil down and blended the color with my blender brushes.  After I was done blending, I used the A2 Lacy Layers Die set from Waffle Flower to cut the scalloped edging on the panel.
I used black ink to stamp the "seeds" on the strawberries and the sentiment.  I used the same scallop die set to cut the sentiment piece.  
I adhered everything together on the card base and to finish the card, I added the black twine bow,

Now it is your turn.  Create a card background and share it with us at Mix It Up Challenge Blog.  Thank you for stopping by.  Please leave me a comment.


Have fun

Monday, July 3, 2023

Mix it Up Challenge Blog- Apeture Challenge

Hello Crafty Friends,

We have a new challenge at Mix it Up and it is a fun one.  The challenge is to create a card with an aperture opening.  When I thought of this technique, I thought about a shaker, so that is what I did.


I created the card by first die cutting the Happy Birthday from the front of the card base and the card front at the same time.  On the back of the card front and the front of the card base, I placed acetate.  I then placed my foam tape around the opening and placed my shaker elements inside.  Here is what it looks like from the inside.


 To finish the card, I die cut the words from pink cardstock and cupcake pattern paper and adhered these to the card front.  To of my favorite things, shaker and simple.  I love it.

Now it is your turn to try this technique.  Share your project with us at Mix it Up Challenge blog.  Don't forget to leave me a comment.


Saturday, July 1, 2023

Love to Craft Challenge Blog- Anything Goes


 Hello Crafty Friends,

It is July 1st, can you believe it?  The summer is in full swing and it is a holiday weekend.  I have so many crafty projects I want to work on this weekend.

Today, I want to share my design team project for the challenge of Anything Goes over at Love to Craft Challenge Blog.

Here is the card I creating using all supplies from Taylored Expressions.

The card base was created using blue foil on the plaid foil its.  I then finished the plaid pattern with Cookie Monster and Peapod inks. I cut the panel with the frayed edge stacklets. 

I then stamped the Happy- On the Block- Happy Shadow with Cookie Monster ink and die cut with the matching die.   I then stamped the Birthday Wishes with All Together Occasions 2 stamp set. 

The panel was then matted with Peapod cardstock on a white card base.

I hope you join us for our challenge over at Love to Craft Challenge Blog.  Also, please leave me a comment.
Saturday, September 3, 2022

Mix it Up! Optional Smooshing Technique


Hello Crafty Friends,

We have a new challenge at Mix it Up, where anything goes, but the optional twist is to do the smooshing technique. I have not done this technique very many times, so I was excited to get my fingers dirty.  

I started by creating the background with the following:

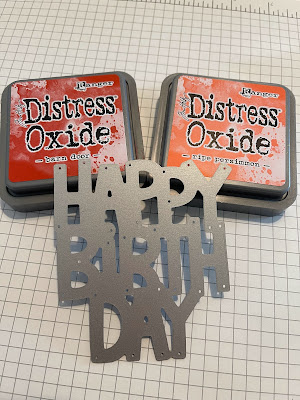
Using a large block, with the two Distress Oxides and some water, I created the background.  I then die cut the "Happy Birthday" from Lawn Fawn from a red and from a grey cardstock and adhered it to the background.

I finished the card by adding some "Tiny Birthday Friends" colored with my Copics to the card.

Thanks for stopping by.  Please leave me a comment. Then join the challenge at Mix it Up! Challenge blog.


Hello

Monday, November 22, 2021

Bitten By the Bug 2: Fun and Games


Hello Crafty Friends,

Bitten by the Bug 2 has a new challenge today entitled "Fun and Games".  My favorite sport, and I do not watch a lot of sports, is baseball.  I enjoy it because I understand it.  I like to attend games for the fun and fellowship.  So, the fun and games I represented in the challenge was Baseball.

Here is the envelope card I created with a file from My Scrap Chick.


 With a few pieces of cardstock and my Cricut, I created a cute envelope card to give to my favorite player.

Here is a look at the back where you could write your message.


Now it is your turn.  Create a project with your Cricut that has to do with fun and games and share it with us a Bitten by the Bug 2.

Thanks for stopping by.  Please leave me a comment.


Thursday, April 1, 2021

Love to Craft Challenge- Anything Goes


 Hello Crafty Friends,

It is April 1st and that means we have a new Anything Goes Challenge at Love to Craft Challenge Blog.  Today I have a fun fold card I tried out to share with you.

I love sloths and I love coffee, so this was a fun card to create.  This is the card folded up.  It makes a 4 x 4 square card when it is folded up.

Here is the card laying flat.


I used Echo Park's Coffee pattern paper in 6 x 6 sheets for the pattern paper.  I then colored the sloth with the coffee cup from Kindred Stamps with my Copics.

Here are the two ends of the card.


The sentiments are from the Echo Park paper pack.

I loved this new technique and will probably use it again.

Thanks for stopping by.  Please leave me a comment and then create a new project and share it with us at Love to Craft Challenge Blog.


Friday, March 26, 2021

Stampin Friends Blog Hop- Monochromatic March


Welcome to the Stampin Friends Blog Hop.  This month and the theme is Birthday Celebration. If you are following along the hop, you should have arrived from Maureen Rauchfuss' blog.  Make sure to read through my blog, comment below and then continue to Jo Blackman's blog.

If you get lost along the way, you can find a list of Blog Hoppers at the end of each blog.

Here are the projects I created for our Monochromatic March theme.   

If you know me, you know I love pink, so of course I would pick pink for my Monochromatic color.


I used 2 different pieces of pink cardstock from my stash to create the card base.  I then stamped the flower from Cottage Bouquet stamp set from Fun Stampers Journey (retired) with pink ink.  I then stamped one whole flower on another piece of pick cardstock.

I added some pink satin ribbon to the left side of the card and to add interest I tied some pink bakers twine around sections of the ribbon.


I finished the card by stamping the sentiment from the same stamp set and added some pink pearls to the card front.

For my project, I wanted to create a small little box to match the card.  So I pulled out my small milk carton die.

I can't wait to fill this little box and give it to a friend.  I used the same supplies as above, but used grey ink on white cardstock for the flower I placed on the top.  I attached the flower to the box by wrapping some pink bakers twine around the top of the box and tying the flower in.

Here are the card and box together.  


Aren't they cute together?  I hope it brings a smile to my friend who receives it.

Thanks for stopping by.  Please leave me a comment and then check out all the other incredible projects from the other ladies this month.

  1. Kirsty Pattrick (UK)
  2. Teri Pocock (UK) 
  3. Jean Beaulieu (US)
  4. Maureen Rauchfuss (US)
  5. Kim Lamos (US)
  6. Jo Blackman (UK)
  7. Heidi Collins (US)
  8. Steph Jandrow (US)
  9. Melissa Thomas (US)
  10. Katja Ettig (GER)
  11. Tiziana Milano (US)


Friday, March 5, 2021

Simply Create Too- Wet or Dry Embossing Challenge


 Hello Crafty Friends,

We have a new challenge at Simply Create Too!  The challenge this month is wet or dry embossing.  I tried a new technique to me, and I hope you like it.


 This is a very easy card, but I love the way it turned out,

I first took a few different green rolls of washi tape that I had in my stash and I placed them on a piece of White Cardstock.  I then wrapped the ends around the card face.

I then used an embossing folder with leaves on it and ran the whole card front through my machine using the embossing folder.

I then used foam squares to attach the panel to the card base.

Lastly, I die cut the words from an Impression Obsession die and added it to the card base.

That is it. Quick and easy and you could easily do the same technique with scraps of paper or cardstock.

Now let's see your creations.  Create something with wet or dry embossing and join the challenge at Simply Create Too.

Thanks for stopping by. Please leave me a comment.


Monday, February 1, 2021

Get Creative Challenge Blog: Anything Goes with a Pink or Red Twist


Hello Crafty Friends,

We have a new challenge at Get Creative Challenge Blog and the theme this month is Anything Goes with a Pink or Red Twist.  I received this adorable image from:


This Virtual Bear Hug image is too cute and perfect for the times we are in and the season of the month, with Valentine's Day.

I started the card base with Whip Cream and Bubble Gum Cardstock from Fun Stampers Journey.  I then layered a piece of Authentique pattern paper.  The pink solid strip across the bottom was actually the strip on the piece of pattern paper that most people cut off. I liked it for another color added to the bottom of the card.

I added some washi from my stash to the bottom and the top of the paper piece, wrapping the tails around the card front.  I then tied the white organza ribbon around the card front and tied a knot.

I then colored the bear with my Copics.

Bear: E29, E27, E23

Bow: RV17, RV34

Heart: R56, R37, R35

I added the fluffy bear texture to the bear by tapping my colorless blender on the colored areas.

I then die cut this finished image with Journey Oval die set from Fun Stampers Journey and added the image to the card using foam squares.   

To finish the card, I added the red heart embellishment from Authentique, included with the paper pad I used for the card. 

Thanks for stopping by,  Please leave me a comment and then join the challenge at Get Creative Challenge Blog.


Thursday, December 17, 2020

Cup of Cheer

 Hello Crafty Friends,

Today I am sharing a project I created using all Dollar Tree items and through the process learned a new thing on my Cricut.

I created these adorable little cups of cheer using all things you can find at Dollar Tree; red mini cups, caulk, straws, brown paint, ribbon and sprinkles.

The learning experience came in when I had to create the little cup labels.  I learned how to print and cut stickers from my Cricut.  What a fun new technique.  I can't wait to create more stickers.  I am amazed at what I can do with my Cricut.

Thanks for stopping by.  Please leave me a comment. 


Monday, September 21, 2020

Leaves to a Good Friend

Hello Crafty Friends,

Today, I have a fun technique card to share.  


You first start with a piece of cardstock cut 4 1/4 x 11 and fold in half as usual.

Then you cut from one side a piece measuring 3 3/4 inches, give or take.  Then take this piece and cut it in half.  One of these pieces becomes the bottom and one of the pieces becomes the vertical piece that holds the bottom piece on. 

The inside of the card will look like this.


Then decorate as desired.  Here, I used pieces from the Forever Fern bundle from Stampin Up. 

Thanks for stopping by.  Please leave me a comment. 

Saturday, July 18, 2020

With Sympathy

Hello Crafty Friends,

Sympathy cards are not the cards we want to make.  They are always the hardest to send too.  Today I want to share the sunburst technique on a simple card.


I used the pattern paper Wild and Free by Frank Garcia to create the sunburst.
The card base and sentiment strip are Butter Cream Cardstock from Fun Stampers Journey.

I created the sunburst background and then cut the whole piece to fit the card front.  I then cut a strip of the Butter Cream Cardstock to stamp the sentiment from Inside and Out stamp set from Fun Stampers Journey and Black Licorice ink, also from Fun Stampers Journey.

I finished the card by adding an image that I cut from an icon page from the collection and adhered it to the card with foam squares.

Thanks for stopping by.  Please leave me a comment.

Wednesday, June 3, 2020

Starburst Technique Coffee Card

Hello Crafty Friends,

Have you seen the new technique of starburst cards?  I have had too much fun trying them out.

Here is the card I created using the Echo Park Coffee Collection.


The card starts with a 4 1/4 x 5 1/2 inch cardstock piece. 
Each pattern piece of paper is cut at 1 1/2 x 6 and then cut on the diagonal.
Then you place the first strip down in the middle of the card and build from there. 
Pretty easy.

To finish the card, I added the cup strip to the bottom of the card.  I cut this strip from one of the piece of paper.  I then added the sentiment from an icon sheet in the collection. 

Thanks for stopping by.  Please leave me a comment.

Thursday, January 16, 2020

Stampin Friends Blog Hop- Birthday Bash


Welcome to the Stampin Friends Blog Hop! This month’s theme is Birthday Bash. If you are following along the hop, you have arrived from Rachel's blog. Be sure to read through my blog, comment below and continue to Teri's blog. If you get lost along the way, you can find a list of Blog Hoppers at the end of each Blog.
Here are the projects I created for this month’s hop


I created the shaker part a little different.  I used tulle instead of acetate.  I have seen this technique, but had never tried it before.  You create the same "sandwich"; frame, acetate, foam tape, background piece; you just need to substitute the acetate for tulle.

I then used silk in Silver and Gold from Fun Stampers Journey to brighten the background, card layer.

I cut strips from pattern paper to create the flags on the front.  I then stamped the sentiment on to a star die cut.

The one thing I learned is that you can not use little "fillers" in the shaker card this way because they sneak out the holes in the tulle.  


 My project, is a sweet little triangular box I die cut with the free file from Dreaming Tree called Christmas Treats Gift box.  I used the same pattern paper I used for the background of the shaker area. 

I then die cut a silver and a white star and stamped the matching sentiment on the star.   I tied a black licorice twine bow at the top of the box. 

All supplies are from Fun Stampers Journey, except the shaker filler.  The shaker filler came from Akron.
Don’t forget to go to the next hopper to continue hopping along

Here is the list of hoppers if you get lost.
  1. Rachel Rife - https://rachthestamper.com/birthday-bash-blog-hop/
  2. Kim Lamos - https://www.pinkzebrapapercreations.com/2020/01/stampin-friends-blog-hop-birthday-bash.html
  3. Teri Pocock - http://www.stampinmagic.com/2020/01/stampin-friends-blog-hop-birthday-bash.html
  4. Cheryl Taylor - http://cheryldiana.co.uk/stampin-friends-birthday-bash-january-blog-hop
  5. Jo Blackman - http://www.joblackman.com/2020/01/sf-2020-january-birthday-bash-blog-hop.html
  6. Steph Jandrow - https://stampinandscrappinwithsteph.weebly.com/home/Stampin-Friends-2020-Birthday-Bash-Blog-Hop
  7. Katja Ettig - https://www.kleine-stempelmiez.de/2020/01/16/stampin-friends-blog-hop-birthday-bash-2
  8. Lisa Ann Bernard - https://www.queenbcreations.net/2020/01/stampin-friends-birthday-bash-hop.html
  9. Kim Quade - https://kimplayswithpaper.com/home/stampin-friends-birthday-bash
  10. Heidi Collins - https://on-y-go-stamping.weebly.com/home/stampin-friends-blog-hop-birthday-bash
  11. Maureen Rauchfuss - https://crazystampinglady.blogspot.com/2020/01/sf-2020-january-birthday-bash-blog-hop.html
  12. Jean Bolen Beaulieu - https://danantmom.blogspot.com/2020/01/stampin-friends-2020-blog-hop-birthday-html
  13. Anne Marie Hile - http://www.stampinanne.com/2020/01/birthday-bash-january-stampin-friends.html
  14. Barbara Welch - https://creativestampinspot.blogspot.com/2020/01/stampin-friends-birthday-bash-blog-hop.html
  15. Melissa Thomas - https://seatoseastampin.weebly.com/blog/stampin-friends-2020-blog-hop-birthday-bash
  16. Sue Vine - https://misspinkscraftspot.blogspot.com/2020/01/its-birthday-bash-with-stampin-friends_17.html
1.  

-->