Sunday, December 25, 2016

Jesus is the Reason for the Season

Merry Christmas!  I hope you are having a wonderful day with your friends and family.  I encourage you to remember the true meaning of Christmas.   We celebrate because Jesus became a humble baby on Earth this day. 
I created this card using the Silent Night stamp set and colored them with Journey Color Burst Pencils.
Merry Christmas to you and your family.

Saturday, December 24, 2016

Merry Christmas

Happy Christmas Eve.  I hope you are ready for all the festivities.
Today I want to share one of the last cards we created in my classes this month.
The base of the card is Cranberry Bliss Cardstock with a layer of Fresh Forest Cardstock.  Then I placed a layer of Whip Cream Cardstock on top, which is behind the piece of Designer Vellum sheet.
Next, I stamped the Flower Layers on Whip Cream Cardstock with Cranberry Bliss ink several times.  I then detail cut the flowers and adhered the bottom layers to the vellum.   I then added the top layer with foam squares.
The Sparkle Drops I colored with the Lemon Drop ink pad and adhered them to the flowers.
I adhered the vellum piece to the card, using adhesive only behind the flowers.
To finish the card, I stamped the sentiment from the Holly Jolly stamp set, with Cranberry Bliss ink on Whip Cream cardstock.  Enjoy!

Friday, December 23, 2016

Sparkle and Shine

We are only two days away from Christmas.  Today I want to share another card I created for my classes for December.
The base of the card is Whip Cream Cardstock.  I then took a piece of Candy Apple Cardstock and embossed it with the Yummy Dots embossing folder.
Next, I stamped the ornaments from the Holly Jolly stamp set with Fresh Forest ink on a strip of Whip Cream cardstock.  I stamped the same ornaments with Beach Ball ink on a piece of scrap Whip Cream.  I detail cut the blue ornaments and added them to the strip of green ornaments.  I adhered this strip to the card.
I then wrapped a piece of Journey Thread Silver around the card and tied in a bow.
I die cut a Journey Oval, stamped the sentiment from Holiday Script (discontinued) in Beach Ball ink and adhered it to the card, cutting off the side of the oval.
To finish the card, I added a few Journey Sequins-Special Celebrations and Journey Glaze and Journey Sparkle Dust to a few of the ornaments.  Enjoy!

Thursday, December 22, 2016

Christmas Trees

We are only 3 days away from Christmas and I want to share a card I created for my last class.
The base of the card is Whip Cream Cardstock.  I stamped the tree from Christmas Trim two times on the Whip Cream Cardstock with Black Licorice ink.  I then stamped one on Color Splash paper.  I let the ink dry for a few minutes.
I then added a strip of Fresh Forest and Cranberry Bliss Cardstock to the left side.  I wrapped a piece of Journey Thread Silver around the card.  I then added two pieces of Twinkle trim and tied it to the knot and tied a bow.
I stamped the sentiment from Oh Holy Stamp Set with Pomegranate Splash ink.
Now, back to the Color Splash Tree.  I detail cut the tree out and then colored it with my Journey Color Splash pencils.  I then used the Journey Blending Brush filled with water to move the color around.
To finish the card, I added the tree to the card with foam squares and then added a few Journey Sequins Holiday Elements to the trees.  Enjoy!

Sunday, December 18, 2016

CYCI# 143

Hello!  Thanks for stopping by.  Can you believe that Christmas is just a week away?  II can't believe it.  I love Christmas and making Christmas cards.  Today is no different. 
Today we have another great sketch challenge over at Can You Case It?  I knew I wanted to do a Christmas card. 
Image may contain: text 
Here is the card I designed.
 
The card base is Whip Cream cardstock.  I cut a small square for the image and placed it on the card with a piece of scotch tape.  I then stamped the two trees from Winter Holiday in Kiwi Slice ink onto the piece.  I then stamped another one on a separate piece of Whip Cream cardstock and detail cut this one out.
I took the Whip Cream square off and matted it on to a piece of Kiwi Slice Cardstock.  I then adhered this to the card. I then adhered the tree to the card with foam squares.
Next, I stamped the sentiment from Winter Holiday with Candy Apple ink on Whip Cream cardstock and cut the end into a banner.  I adhered this to the card and added a wooden snowflake to the end.
To finish the card, I added Journey Glaze to the trees and sprinkled Journey Sparkle Cuts to make wintery trees.  Enjoy!

Saturday, December 17, 2016

Journey Blog Hoppers- Holidays


Welcome to the Amazing Journey Blog Hoppers Hop!  This month's theme is Holidays  I'm so happy you're hoppin' along!  If you arrived from Ruth Cooper blog, you're on the right track.  If not, that's ok too!  Just continue the hop and you'll come full circle!

http://www.sassyangelsstudio.com/be-amazing-blog-hop/

Now, let's get to my projects. First the card.
I started with a piece of Cool Pool cardstock for the base.  Using Clear Pigment ink, Journey White embossing powder and Snow Burst stamp set, I created the background.  
I die cut a few piece of Bloom Clusters from Journey Brush Silver Cardstock.
Then I started making layers with a Whip Cream cardstock Border Details, a piece of Vintage Lace and Be Cool Journey Tape.  I then added a Snowflake Element, a wooden snowflake (past Bloom Benefit) and a Twinkle Trim bow tied with Whip Cream Thread.
To finish the card, I stamped the sentiment from Winter Holiday with River Stone ink on Whip Cream Cardstock.

Now for the project.
I created an 11 x 14 canvas to match the card.
I started the canvas by painting it with Cool Pool Acrylic Paint and used Journey Modeling Paste and the Winter Wonderland stencil.

I let it dry overnight and then rubbed some Silver PanPastel over the top and then sprayed Shimmer Silver Color Splash over that.

I then started layering with Border Details from Whip Cream Cardstock, Vintage Lace and Cool Pool Satin Ribbon.  I then added the same layers as the card.

Thank you for stopping by.  I hope you are inspired by my creations.  Please don't forget to click the Next button to continue on the hop with Crissy Salima Rivas blog.

http://www.iheartscraps.com/blog
Journey Hoppers this month:

www.funstampersjourney.com/kimlamos

Friday, December 16, 2016

Peppermint Mocha

I absolutely love Peppermint Mocha this time of year.  In fact, we have a tradition to look at Christmas lights on Christmas Eve and part of that tradition is a Peppermint Mocha.
The base of the card is Candy Apple and a layer of Whip Cream Cardstock.  On the Whip Cream cardstock, I put a few stripes of Washi Tape I had in my stash.
I then stamped the swirl from the Blown Up stamp with Candy Apple ink on Whip Cream Cardstock.    I stamped the coffee cup from Hey Sugar on Whip Cream cardstock with Candy Apple ink.  I then detail cut them both out.
Next, I wrapped the swirl with cellophane and tied the ends with Whip Cream Thread.  I added this to the card using foam squares.  I added the coffee cup the the card with foam squares and covered the whole top with Journey Glaze.
To finish the card, I stamped the sentiment from Hey Sugar on the bottom right corner with Candy Apple ink. Enjoy!

Thursday, December 15, 2016

Christmas Tea

Today is International Tea Day.  What a better way to celebrate, but with a Christmas tea Card.
The base of the card is Whip Cream Cardstock and a layer of Cranberry Bliss Cardstock.  I then took a piece of Whip Cream Cardstock and stamped the tea cup from Tea Time with Black Licorice ink all over.  I then stamped one tea cup on a piece of Whip Cream cardstock which will become the one I colored with my Journey Color Burst Pencils.   I then detail cut this one out.
I wrapped a piece of Vintage Lace around the card first.  Then I wrapped a piece of Candy Apple Satin Ribbon around and tied one end with a Journey Thread Silver tied a bow.
I then die cut a Journey Circle with the piercing element out of Cranberry Bliss Cardstock and tucked this under the ribbon.  I added the colored tea cup to the card using foam squares.
To finish the card, I added a few pearls.  Enjoy!


Stampin Friends Blog Hop- December


Screen Shot 2016-06-04 at 4.16.24 PM
Welcome to the Stampin Friends Holiday Blog Hop! If you arrived from Cindy Slack Waldroff's Blog, thank you for continuing with the hop! Don’t forget to click the Next Button to check out Barbara's amazing creations. PLUS, keep reading for a chance to win a bunch of new crafty prizes!

Screen Shot 2016-06-04 at 4.16.43 PM

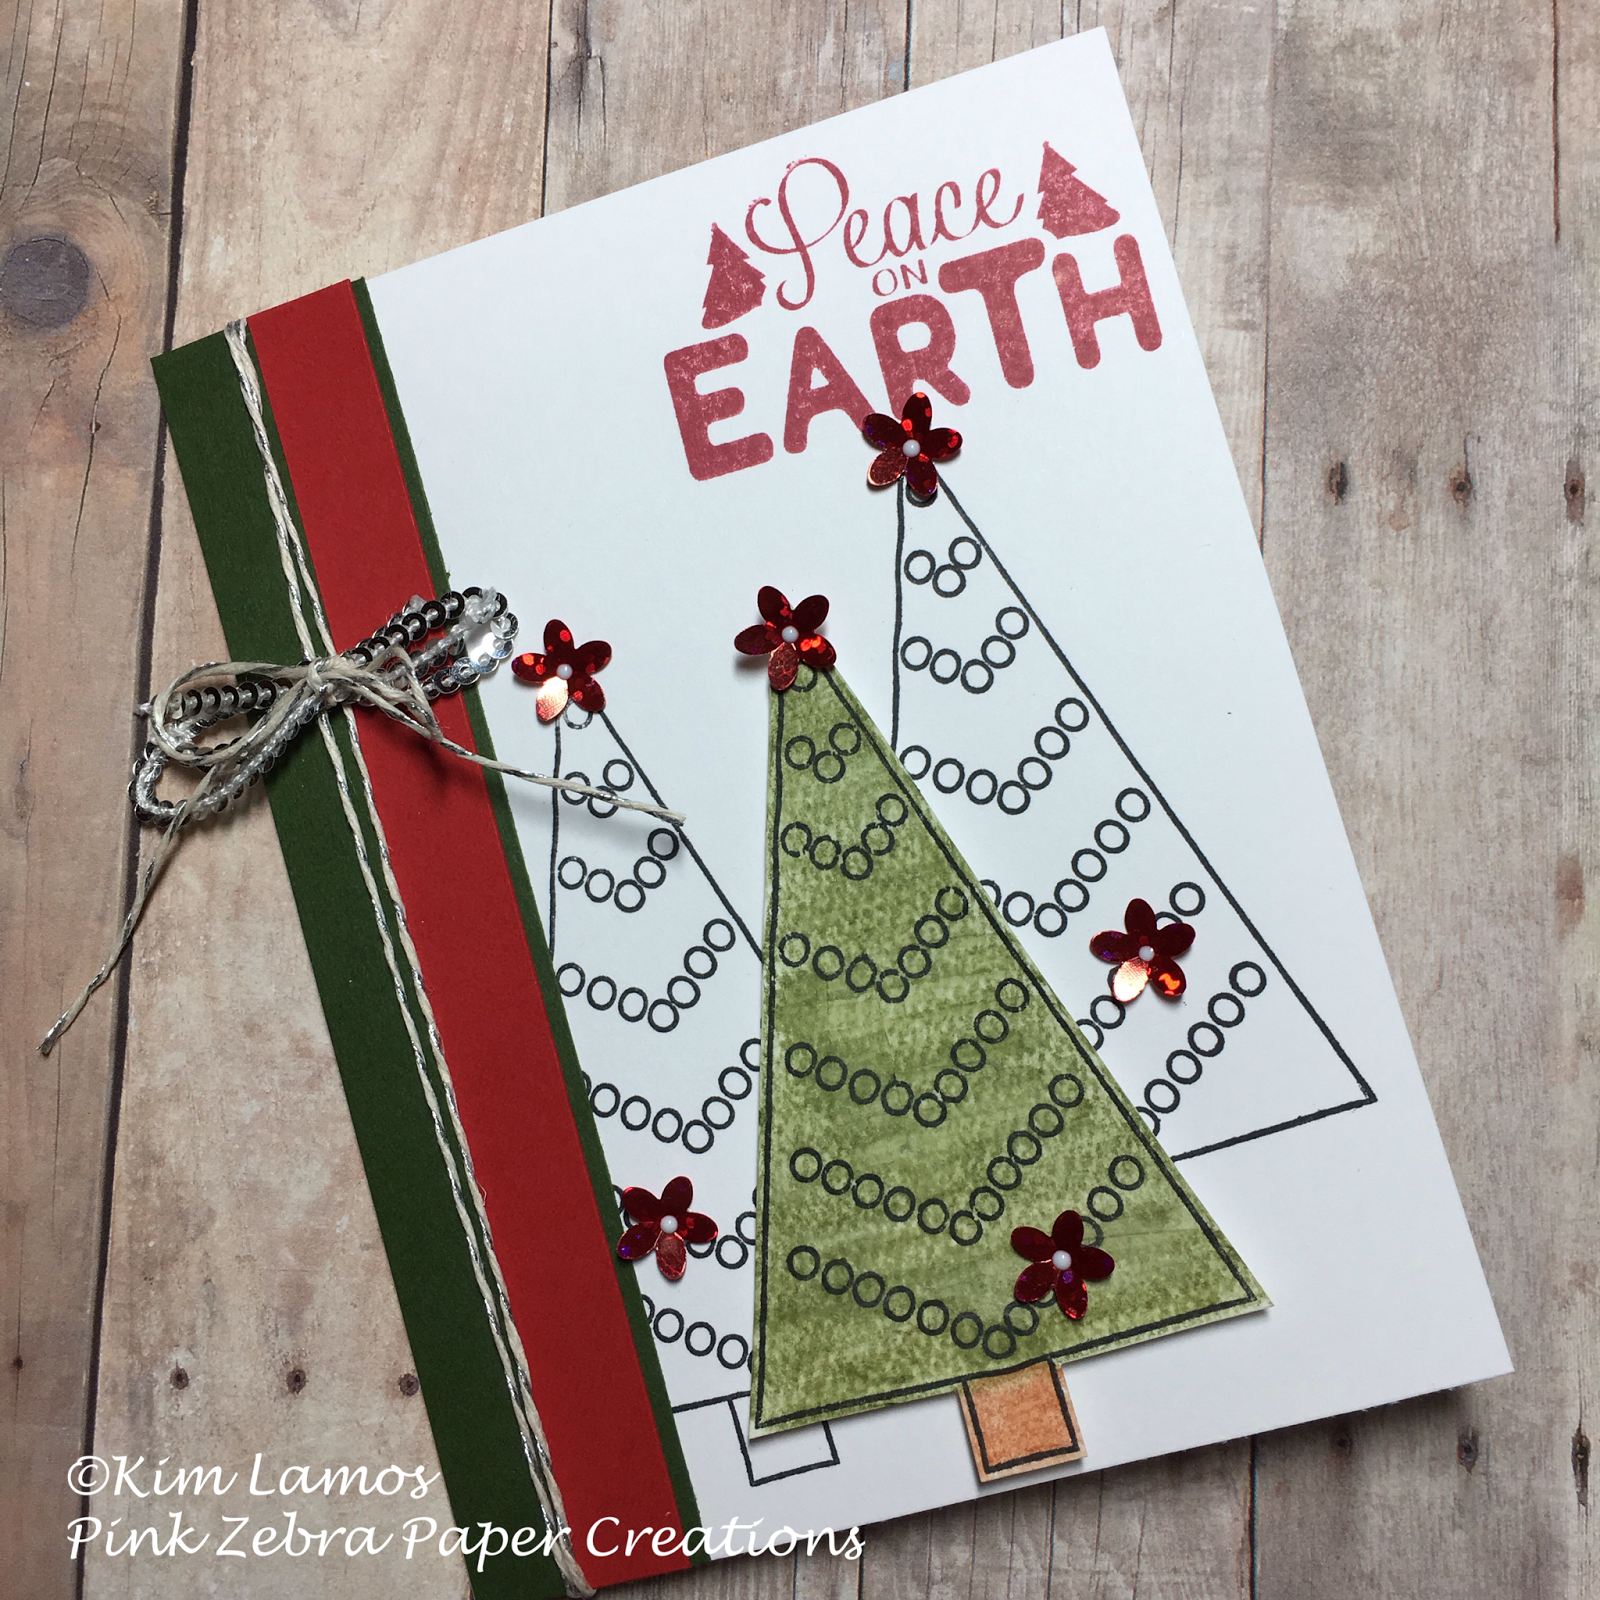
So, let me share with you my card first.
I used Black Licorice Cardstock as the base of my card.  I then cut a layer of Whip Cream Cardstock and stamped randomly the stamps from the Countdown stamp set with Black Licorice ink.
Next, I cut a layer of Vellum Designer Prints with silver stars and added it to the top of the card.
I then die cut a Create-a-bow Mini from Journey Brush Silver Cardstock and adhered it to the card with hot glue.
To finish the card, I stamped the sentiment from the Countdown set with Black Licorice ink on Whip Cream Cardstock, cut the banner end and adhered it to the card.

Now for the project.
I started by creating the tag, by tracing the medium sized Banner Parade die cut on one side onto Black Specialty Pearled Paper and cut out.  I then traced the inside of the same die on White Specialty Pearled Paper.  I then die cut the next side down Banner Parade from the the White Specialty Pearled Paper.  I took this piece and adhered it to the base with foam squares.  
I then die cut the same Create-a-bow Mini from Journey Brush Silver cardstock and adhered the bow to the base with hot glue.
To finish the tag, I added 3 Celebration Buttons to the front, stamped the same sentiment as above from the Countdown stamp set on Whip Cream Cardstock with Black Licorice ink.

Thank you for stopping by.  Don't forget to comment here using the #SFDecHop to be entered into the mystery giveaway.


I hope you found some Christmas inspiration.  Click on the next button to go and visit Barbara's blog.

Screen Shot 2016-06-04 at 4.16.35 PM

If you get lost, here are the bloggers with us this month:

Wednesday, December 14, 2016

Peppermint Hot Chocolate

Another great treat at this time of year is Peppermint Hot Chocolate.
The base of the card is Fresh Forest Cardstock, with a layer of Fresh Forest Cardstock that I embossed with the Beach Towel Embossing Folder.  
The bow I created by using the Mini Create-a-bow die and Candy Apple Cardstock.  
I then stamped the mug from Cozy Wishes with Dark Roast ink on Buttercream  and Candy Apple Cardstock.  I detail cut these out, distressed them and paper pieced them back together.    I added them to the card.
Next, I stamped the circle swirl from the Blown Up set with Candy Apple ink on Whip Cream Cardstock.  I detail cut this out and using a piece of cellophane, I wrapped it and tied it with Whip Cream Thread, to look like a peppermint candy.  I added this to the card using foam squares.
I finished the card by adding a Brown button which I thread with Journey Natural Twine.  Enjoy!


I Love You A Latte Stocking

A great day for another great project for the Winter Coffee Lovers Bloghop!
The base of the card is a Whip Cream Cardstock, with a layer of Christmas pattern paper I had in my stash.
I then die cut the Chubby Stocking using Whip Cream and Candy Apple Cardstock and adhered it to the card making a pocket.
I then stamped with Dark Roast ink on Whip Cream and Candy Apple cardstock the little coffee cup from the Hey Sugar set.  I detail cut the pieces and paper pieced them together.  I tied them on to the stocking using Black Licorice Twine and some Twinkle Trim also.
To finish the card, I stamped with Hazelnut Blend ink, the sentiment from Hey Sugar on Whip Cream Cardstock, distressed the edges and added it to the card.  Enjoy!

Tuesday, December 13, 2016

Tis The Season for Cocoa

I have another great cocoa project for the Coffee Lovers Winter Bloghop.

The base of the card is Whip Cream Cardstock and layers of Christmas Pattern paper I had in my stash.
I then stamped the mug from Christmas Mug (FSJ Bloom Benefit) with Black Licorice ink on Candy Apple and Whip Cream Cardstock.  I detail cut these pieces out and put them back together.  I used the Journey Color Burst pencils to color in the "cocoa".  I added this to the card using foam squares.
Next, I wrapped a piece of ribbon from my stash around the card.  I stamped the sentiment, Tis the Season, from Christmas Trim with Candy Apple ink on Whip Cream Cardstock.
To finish the card off, I added a Wooden Snowflake to the mug.  Enjoy!


Monday, December 12, 2016

Cozy Wishes

I always look forward to participating.  Today I have a card for those cold cocoa nights.
The base of the card is Cranberry Bliss Cardstock.  I used the Say It! embossing folder to add the lines into the base.
Next, I cut a piece of Party Pop Prints, ripped the side off and added it to the card.  I then wrapped a piece of Oatmeal Cookie Satin Ribbon around the card and tied a knot.
I stamped the mug from Cozy Wishes with Dark Roast ink on Buttercream Cardstock and Fresh Forest cardstock.  I detail cut the piece out and adhered the cozy to the mug.  I used an exacto knife to cut the top out.  I then stamped the candy cane from Holiday Sparkle set with Black Licorice ink and colored with Journey Color Burst pencils.  I detail cut the candy cane and added it to the card, through the slit.
I finished the card by adding the sentiment from the Cozy Wishes set with Cranberry Bliss ink on Buttercream Cardstock and tying a few Jingle Bells to the mug with Natural Journey Twine.  Enjoy!

Sunday, December 4, 2016

Can You Case It? #142

Can you believe it is December already?  Where has the time gone?  It seems like just yesterday we were starting school and getting ready for Halloween.
Either way, I love Christmas.  I love the smells, the colors, the sounds, all of it. 
Today, we have a color challenge for you at Can You Case It?  The more I looked at these colors, the more I liked them.
http://canyoucaseit.com/?p=3590

Here is the card I created


I started the card with a piece of Whip Cream and Pretty Pansy cardstock.  Next, I took a piece of Whip Cream cardstock and stamped the Snow burst snowflakes with Clear Pigment Ink.  I then took Silver PanPastel and rubbed over the top.  Tada!  I beautiful, silvery background.
Next, I took a piece a strip of Whip Cream Cardstock and stamped the Noel from Noel Chirp in Pretty Pansy ink.  I tore the end off of the strip and adhered it to the card.  I then took some silver washi tape I had in my stash, on either side of the sentiment.  Then, I wrapped a piece of Tinsel Trim around the card and adhered the layer to the card base.
To finish the card, I splattered some Silver Silk to the card and added a wooden snowflake to the bottom.  Enjoy!